
RPX Technologies, Inc. Revolutionizes UAV Thermal Imaging with Groundbreaking EmbIR™ UAV-6407/17/2024  RPX Technologies, Inc. proudly announces the launch of the EmbIR UAV-640, a thermal imaging solution that redefines Size, Weight, and Power (SWaP) efficiency. This state-of-the-art thermal camera, with its ultra-compact design measuring approximately 20 mm and weighing a mere 6.9 grams, delivers impressive performance in a lightweight package.
At the heart of the EmbIR UAV-640 is RPX Technologies’ proprietary LightWeaver™ shutterless thermal camera core. This advanced technology enables the camera to produce high-fidelity 640x480 thermal images, crucial for intelligence, surveillance, reconnaissance, and target acquisition operations. The EmbIR UAV-640 sets a new benchmark in the industry, offering superior thermal imaging with minimal SWaP, making it an ideal payload for modern UAV applications. “Innovation lies at the heart of RPX Technologies, and the EmbIR UAV-640 exemplifies our commitment to pushing the boundaries of technological advancement,” said Levi Valdois, Director of Sales and Marketing at RPX Technologies. “This groundbreaking thermal camera not only meets but also exceeds the evolving needs of the UAV industry, offering unmatched performance and reliability, and answers the need for domestically manufactured payload technology.” In addition to its technological superiority, the EmbIR UAV-640 is manufactured in the USA and compliant with the Blue UAS Framework, ensuring freedom from components sourced from restricted or primarily foreign manufacturers. Custom configurations are available, allowing the EmbIR UAV-640 to be tailored to specific operational requirements. As the demand for advanced thermal imaging solutions continues to soar, RPX Technologies remains dedicated to providing cutting-edge products that empower UAV operators worldwide. The EmbIR UAV-640 is now available for purchase, and interested parties can visit rpxtech.com/uav-thermal-cameras for more information and specifications. Contact: Levi Valdois | 1.833.268.7653 | [email protected] This product is controlled by U.S. Government and intended for export only to the designated country for use by consignee or end-users identified. Approvals required for other uses. by Kevin Knight Here’s a really expensive aviation chemistry formula: Iron + Oxygen + Water = Rust When rust develops in our airplane engines, it’s a costly cancer. However, just like cancer, if it’s stopped before it can get started, the odds of extending an engine’s life rise dramatically. Most of my flying and homes have been in coastal areas where rust is more prevalent. However, drier places like Colorado aren’t immune from that metallic rot. Since rust is everywhere, I recently decided to go beyond adding CamGuard to my oil every change and purchased an engine dehumidifier called DryBot. 
In the beginning … I began my career working at Alcoa Aluminum’s Davenport Works in Iowa. We made wing skins for Boeing jets, so I spent many hours in the plant’s testing lab. As a result, I have a strong bias for engineers whose work is grounded in hard data and solid science. Since I had read about various engine dehumidifiers online and seen them advertised by Aircraft Spruce, I wanted to determine if DryBot, the latest market entrant, was worth nearly $1,200. In years past, if my M20F’s engine wasn’t being run during the winter, I used “desiccant spark plugs” with water-absorbing silica beads. The problem was, once the desiccant changed color from pink to light blue, they were saturated and were no longer doing any good. I wanted something that was continually operational and self-maintaining so my engine would stay healthy while I was enjoying sunnier weather elsewhere. Being research driven, I contacted Matthew Dock, DryBot's co-creator and president of RPX Technologies in Oklahoma. The company’s DynaVibe is the market leader in prop balancing technology.
Sweating Product Details to Reduce Engine Moisture To prevent that from happening in the rebuilt engine, Matt built a do-it-yourself dehydrator that used silica desiccant, but it regularly maxed out on moisture. That required Matt to dry out and replace the silica regularly. Doing that got old pretty fast, so he bought a well-known commercial dehydrator. One day, he noticed a water droplet going from the device into a clear, plastic tube into his engine. That was the opposite of what he expected. Ever the engineer, he bought some humidity sensors from Amazon to track what was going on inside the engine. He discovered that the internal humidity in the engine went down the first few days of dehydrator use, then started rising. He concluded it was because the device used a cooling plate that couldn’t keep up with the high humidity of Oklahoma. To confirm his conclusions, he did the same experiment using a second identical dehydrator and got the same result. That led Matt and his partner Mike Fox to design DryBot. Mike is also a trained engineer. Their product innovations included inflow and outflow monitoring of air, inclusion of a liquid silica desiccant to extract moisture from the air before it entered the engine, and automated drying of the desiccant. Their calculations indicated the desiccant could have the moisture removed from it daily for ten years and still retain 80% of its capacity. If that material ever had to be replaced, DryBot will alert pilots by generating a red, LED error code. The factory will replace the material for $199. The outbound air pressure is a steady .1 PSI. Tests with a bank of internal sensors have shown it takes around 15 minutes to purge excess moisture from the engine. The dry air it pushes into the airplane engine is not recycled back into the DryBot, since that would contaminate the silica. Matt and Mike showed that if humidity in the hangar is 80 percent, the DryBot's air humidity is less than 20 percent. That’s noteworthy since the “critical humidity” required for rust to start forming is 40 percent. If humidity is below that level, ferrous alloys, such as steel, will not rust, and aluminum will not corrode.  Since my cylinders cost more than $1,500 each and DryBot is super simple to operate, I viewed it as cheap, long-term insurance. I also appreciate that DryBot is built in the USA, providing jobs to 25 hard working Oklahomans. For some visuals, this experimental homebuilder produced a pair of YouTube videos worth watching: DryBot for Airplane Builds and RV-10: DryBot Data Logging, both by BuildFlyGo's Guil Barros. It is still important to run your engine regularly and fly. Engine manufacturers recommend getting the oil to at least 180 degrees Fahrenheit for an hour so it drives moisture out of the oil. If you just run the plane up on the ramp for five minutes, then put it back in the hangar, all you’ve done is sucked in a lot of moisture. DryBot could help remove a lot of that moisture, but that’s not optimal. Just tell your spouse you have to fly regularly so the engine will stay in shape. That’s not just a good excuse to go flying, it is also good advice for maintaining a healthy engine.  Knight, K. (2024). Dehumidifying your engine the easy way. The Mooney Flyer, 13(5), 31-32.
Retrieved from https://themooneyflyer.com/issues/2024-MayTMF.pdf. Annual Inspection TimeEvery aircraft owner knows the drill: it's annual inspection time, a mix of routine yet hopeful checks to ensure our planes are in tip-top shape. Our Cessna 210, a reliable performer, entered this inspection with us feeling confident. After all, we'd been diligent with maintenance, and the engine was running as smooth as ever. However, things didn’t quite go as planned. One cylinder came up a bit shy on the compression test. Turning to Continental’s SB03-3 bulletin for guidance, we flew it for another hour, hoping for a pressure change that didn’t materialize. So, it was time to remove and inspect the cylinder. With hindsight being 20/20, perhaps a ring wash should have been tried as well. The real curveball came after the cylinder was removed. Hidden from routine view, our mechanic identified a subtle flaw on one of the cam lobes. This small gouge, while easy to overlook, did have a depth significant enough to snag a metal pick. Those versed in aircraft maintenance might recognize this as a warning threshold, per the indicators in Service Information Directive SID05-1. An email exchange later, Continental verified that the cam needed to be replaced. Thus began our unexpected journey into a deeper teardown. 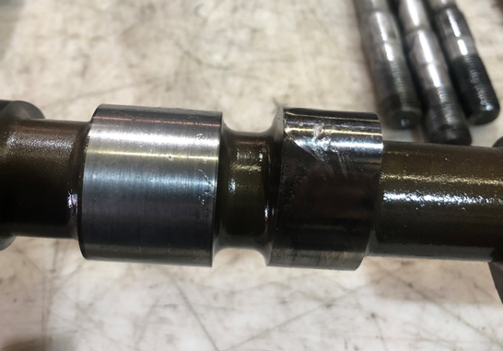 Damaged Camshaft Unsettling to Downright FrustratingWe entrusted our engine to SkyBoss Aviation, a reputable aircraft engine overhaul service facility just outside of Tulsa, OK. Bill Wagner, the seasoned expert over at SkyBoss, took on the task of disassembling our engine. But not long after, he rang us with news that got our attention. Firstly, Bill described the engine's interior akin to a swamp at some point in its lifetime. Internal corrosion was everywhere, rendering many components unfit for service. A complete engine overhaul was the only way forward. 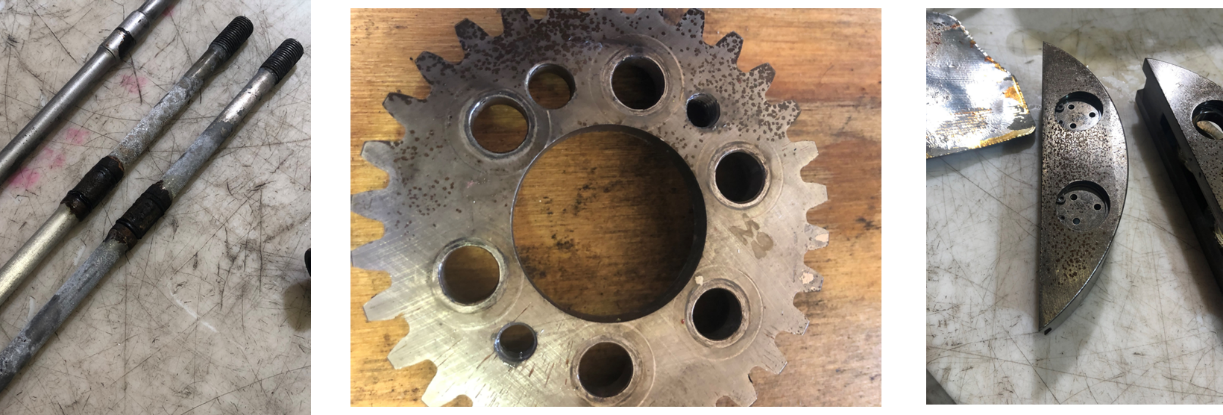 "That Crankcase is a Swamp" - SkyBoss Aviation But then came the kicker. The crankshaft bearings were out of stock. And if that wasn’t enough, approval paperwork for a bearing manufacturing change had yet to be approved by the FAA, effectively putting an indefinite hold on their availability. What we initially hoped would be a few months' delay extended far longer than we ever anticipated, clocking in at a frustrating year-plus of waiting and a staggering invoice of $40,603. Battling the Silent Killer: Engine CorrosionThe extent of our engine's corrosion was shocking. With part after part deemed irreparable, we grappled with not only the mounting expenses but also significant downtime. Furthermore, over a year’s worth of adventures in the 210 were lost. Not to mention the currency and proficiency of an owner-pilot that relied exclusively on this particular aircraft. This ordeal made us hyper-aware of engine corrosion, prompting us to introduce engine dehydrators across our fleet of five personal and corporately owned aircraft. We tested several market-available engine dehumidifiers but found ourselves questioning their efficacy. It was disconcerting to often even see water collected in the tube meant to aerate the engine – a clear indication that something wasn't right! With the drive to understand the situation better, we repurposed small dataloggers (manufactured by us for a different venture) to fit snugly into spark plug holes and crankcase vents. After installing the dehydrators, these sensors began to record the humidity levels inside of our engines and confirmed the dehydration devices' ineffectiveness. 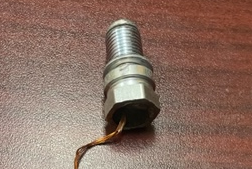 One of the Sparkplug Loggers Used for Rotax 912 Testing For example, our month-long logging exercise for the Long-EZ engine yielded revealing results. The dehydrator initially seemed promising, maintaining a dry environment for about a day. But soon after, the internal humidity levels surged, often breaching the 40% and 50% thresholds. Clearly, this solution wasn't cutting it. And other dehydration methods required constant user intervention which made them impractical. It was off to the drawing board to find a more effective, reliable solution to this problem. 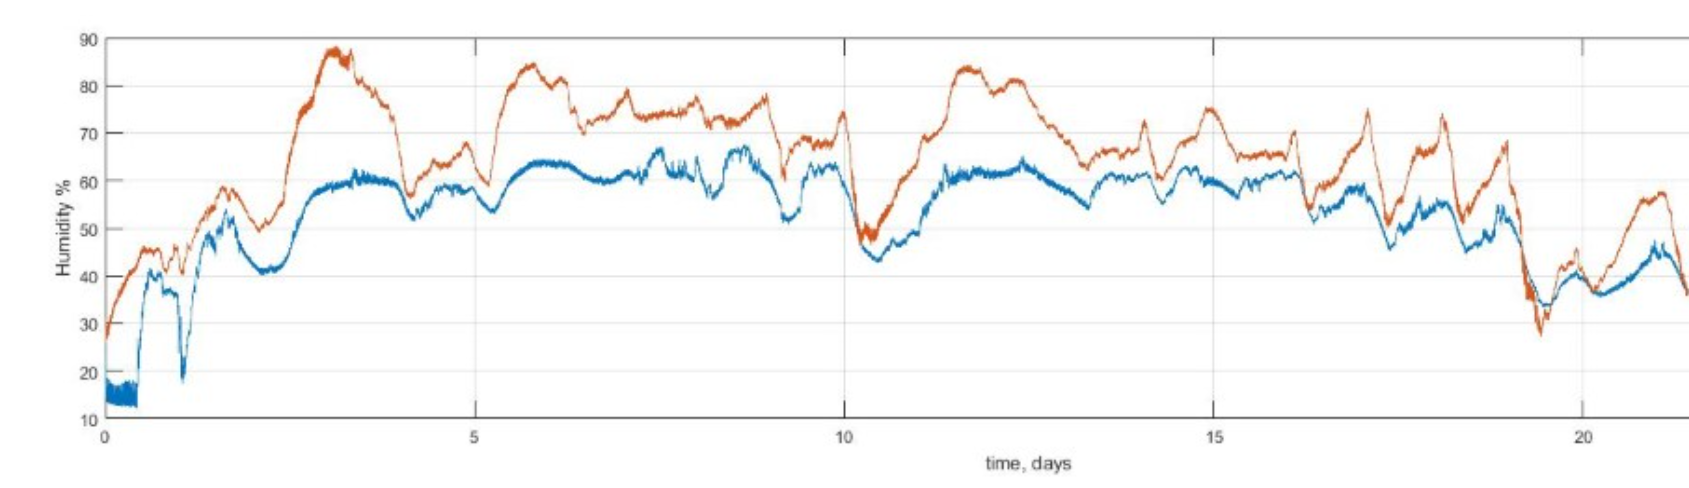 Birth of the DryBot - The Ultimate Guardian Against Engine CorrosionOur search for a solution finally hit a wall. We felt that the market simply didn’t offer a system that was maintenance free and effective in keeping the internal engine humidity below the crucial corrosion-inducing level of 40%. We, and the rest of the aviation industry, needed a reliable solution. Harnessing our passion for aviation and our team of in-house engineers, we set out to design the solution the aviation world was missing: the DryBot. Envisioned as the gold standard of engine dehydrators, DryBot would promise not just reliability, but also minimal upkeep. Its unique self-monitoring features would ensure it's always operating correctly, giving aircraft owners that much-needed peace of mind. In essence, with DryBot, we didn’t just aim to solve our own corrosion problems; we wanted to offer the broader aviation community a trustworthy guardian against the silent but menacing threat of engine corrosion and avoidable early overhauls. 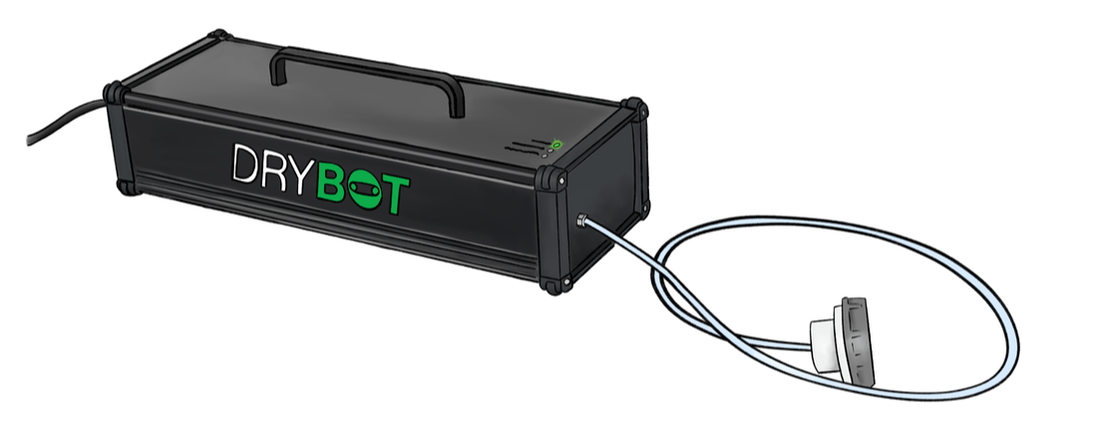 Inside the DryBot: A Deep Dive into its Innovative DesignThe DryBot, our answer to the aviation industry's engine corrosion challenge, is a culmination of extensive research, rigorous testing, and our own frustrating experiences with other systems. Let's unpack what makes DryBot different: 1 - Reliable Dehydration Our search for the perfect dry air source took us through various technologies, from refrigeration systems to desiccant media. Ultimately, desiccant beds emerged as the most dependable method, consistently delivering the dry air needed to prevent engine corrosion. 2 - Truly Maintenance-Free Desiccant-based dehydrators do come with a catch: over time, the desiccant gets loaded with water and needs either replacement or regeneration. Our solution? A specially designed airflow circuit, complete with an integrated regeneration heater and alternate valve actuated airflow path used to expel water. This approach regenerates the desiccant as and when required, eliminating the need for manual intervention. 3 - Smart Self-Monitoring If there's one thing we've learned, it's the importance of reliability. With many systems, you're left wondering if they're doing their job. Is the air dry? Is the air flowing? This isn’t a problem with the DryBot. The DryBot is equipped with a suite of internal sensors that continuously monitor airflow and humidity output. And for a quick status check? A straightforward Green/Red light system flags if everything's running smoothly or if, say, there's a kinked hose blocking flow. 4 - Ultimate Trustworthiness At its core, DryBot's mission is simple: keep the air dry and keep it flowing. But we didn't stop there. We incorporated an inline particle filter, ensuring that not only is the air dry, but it's also clean. Furthermore, safety is paramount, so we added a mechanical thermal thermostat to serve as a backup for controlling heater temperatures. Paired with our heater power measurement circuitry, these sensors work to detect and flag any heater faults.  DryBot, the Automated Engine Dehydrator Validating the DryBot: Real-World DataOur journey with the DryBot wasn't just about engineering a solution, but also ensuring that it was truly effective. That assurance lies in the real-world data our humidity dataloggers captured. In the initial phase, without the DryBot, the data displayed the engine's internal humidity levels mimicking ambient levels but slightly lagging due to the thermal mass of the engine and engine air leakage. Once the DryBot was initiated on day 2, the change was almost immediate. Within minutes, the internal humidity plummeted to 0%. Detecting a rise in output humidity, the DryBot automatically triggered a regeneration cycle of the desiccant bed roughly once per day. While regenerating, the DryBot heats the desiccant bed and purges its moisture, releasing the absorbed water through a discreet opening at its base. Our data vividly illustrates this process: during these purging episodes, the internal humidity saw only a modest uptick, thereby keeping the internal engine humidity between 0% and 20% RH. This is well below the 40% threshold where steel exhibits substantial rates of corrosion. 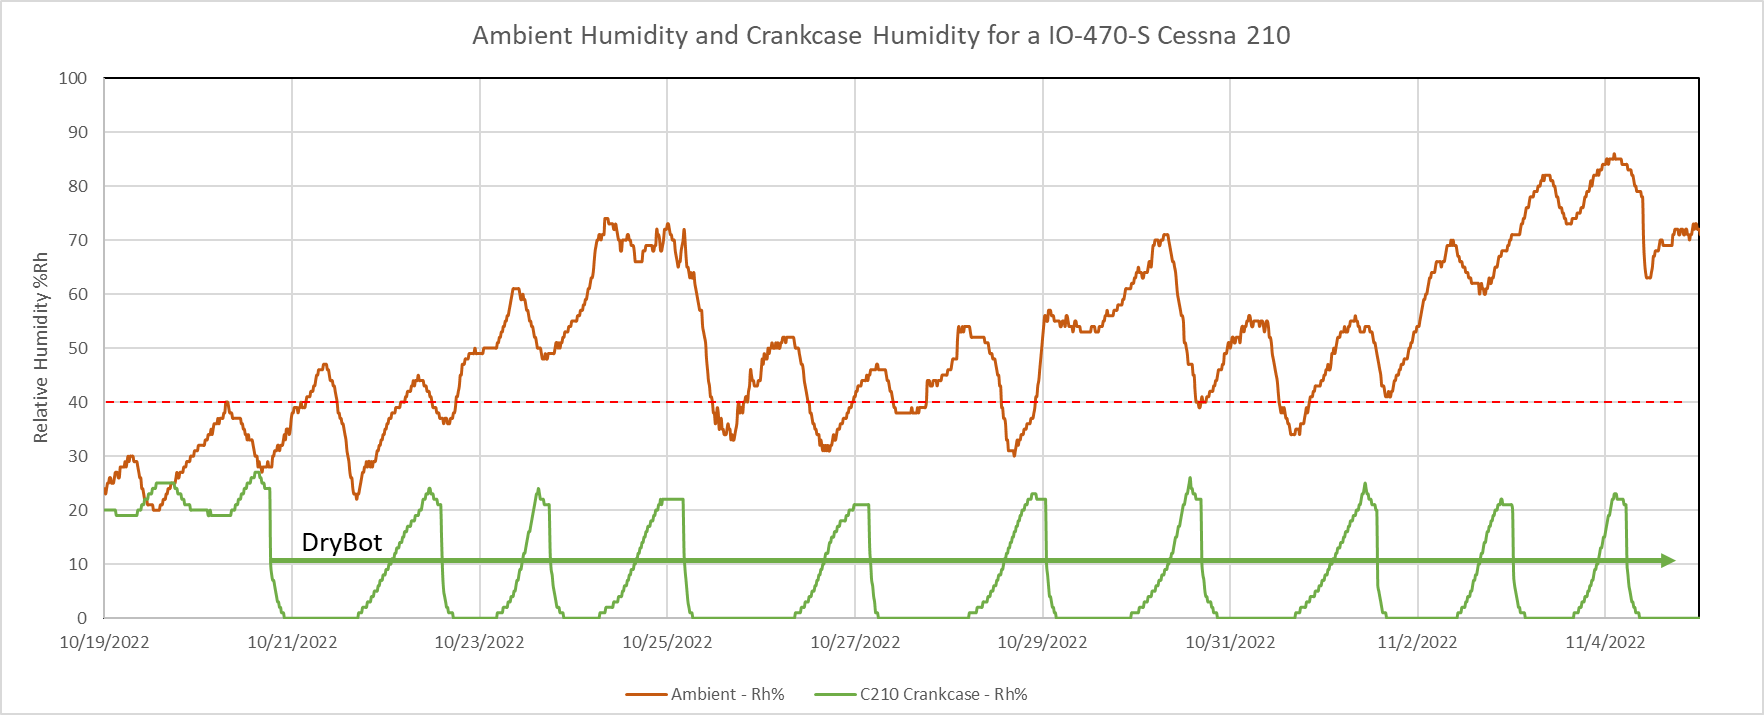 In Conclusion: The journey of developing and validating the DryBot has been a testament to the importance of innovation in aviation maintenance. It's not just about a piece of technology, but the peace of mind it brings to aircraft owners, knowing their engines are safeguarded. In an industry where precision and reliability are paramount, the DryBot stands as a genuine contribution to preserving the longevity and safety of our aircraft.
Sorry. Despite the title of this post, there is no easy way. It's a challenging process. In fact, getting my instrument ticket was one of the most difficult accomplishments of my life. And it took about three years. One issue is that there is an infinite amount of information to learn if you want to "know it all:" Weather, regulations, charts, safety, procedures, etc, etc, etc... and, oh yea, how to fly the plane. When I finally finished, I looked back could see what would have been a much more direct path to the finish line because the expectations I put on myself were somewhat impractical. I would like to share that faster, simpler path with you. Let me start by saying that I'm not a CFII. So this is nothing more than my personal opinion based on my experience. But I hope it is helpful for you as well. First, let's review what is needed for an airplane instrument rating under Part 61: Paraphrased so it is digestible (see FAR 61.65 for the exact wording/requirements), here is your simplified checklist:
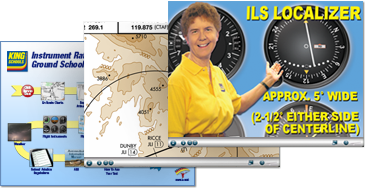
Completing this checklist can be overwhelming. Here's the efficient, step-by-step process I wish I had before I started: Step 1: LOG hood time and clean up your logbookStart now! Keep a hood in the plane and put it on any time that you are flying with an appropriately rated safety pilot. Start early and log every minute you can. Seriously. Also, take a look at Form 8710. You will have to fill that out prior to your check ride. There is a ridiculous amount of information needed that is difficult to calculate from your logbook entries. My recommendation is to get your logbook electronic somehow, and be sure you have all of the columns listed in the 8710 so you can fill out the form. You don't need this distraction the night before your checkride. You need to be studying. Get this done. Start today and chip away at it over time.  Here is the style of hood that I recommend. Foggles let you cheat a little. Step 2: wrap up your cross country hoursBe smart. If you're flying around on the weekends, try to hit that airport a couple of more minutes away so you can count the flight as a cross-country. #1 and #2 are difficult to quickly "knock out" if you're ready to test. So start those ASAP! Step 3: Pass the written.Here's how to do it: a) Watch the King Schools instrument videos. Pay attention when you watch them and watch them again and again until you "get it." Yes, I know they are dated. But I've watched several other training videos that are newer and my opinion is that the King's program is the best for test prep. b) When you're finished with the King videos, buy the Sheppard Air Instrument Prep and follow their instructions. That will narrow down what seems to be an infinite amount of information to a more reasonable amount that will actually fit in your head. c) Now, go pass the written. Get it over with.
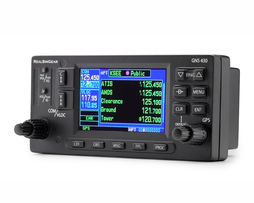
One thing to note here, is that I have not said a word yet about flying with a CFII. Let me hop on my soap box for a minute. I think you should respect your instructor's time and be prepared ahead of time by doing your homework. If your CFII is teaching you what is in the book, you're being lazy and inefficient. Don't do that. Learn what you can on your own and go to your CFII with questions. Pass your written so you have some idea what you're doing. Then go fly. Step 4: Start flying with a CFIIStart immediately after passing your written and don't stop. All of that information from #3 will start draining from your head the minute you leave the exam room. Don't let that happen. Start using what you learned and keep your momentum. Here are some initial thoughts on flying: Your Instructor: Get someone that will challenge you and be sure you have good chemistry. This person is going to teach you skills on which your life will some day depend. If you're not comfortable with your instructor, find a new one ASAP because switching later will cost you more time and money. Your Airplane: I think the right airplane is a C172 with a Garmin GNS430/530 unless you are on a professional route. Then a G1000 is probably more appropriate. Also a complex, high performance airplane wouldn't be my first choice because you will already have your hands (and head) full. And, you could use time to think and a 172 isn't going anywhere quickly. That's good while you're learning. Step 5: Accumulate hoursFly an hour with your CFII, practice hours-on-end using a flight sim like FSX or XPlane, then go practice with a safety pilot. Rinse and repeat. Just remember that the sim is free! Use it. Electrons cost a hell of a lot less than 100LL + airplane + instructor. By the way, you need the sim to be as realistic as possible. For instrument training, this really means the equipment. Be sure the equipment is as close as possible to what is actually in your plane. We had a GNS430, and my opinion the 430 interface is absolutely horrible. To help, I bought a 430 panel for XPlane from RealSimGear. You can run a MUCH more accurate GNS430 simulator with that equipment that way the menus match the real thing. That's what you need. You also manipulate the GPS with real knobs, not a frickin' mouse. Anyway, I love it. Great investment. Highly recommended.
Step 6: Prepare for the check rideOk, crunch time! It should be obvious when you're ready for the flight portion of the test, but now you need to get a TON of information in your head at once for the oral. Here's what I recommend: a) Download, print, and study the ACS. It is free on the FAAs website. There's no excuse for not familiar with this document when you show up for your checkride. Read it. Study it. Know what to expect! b) Buy the book "Instrument Pilot Oral Exam Guide by Michael D. Hayes." No brainer here. Read it cover to cover then... c) Buy 200 note cards and start going page by page through the Oral Exam Guide and start filling them out. Pay particular attention to items that are mentioned in the ACS. d) Divide your note cards into piles. "Easy, Hard, and 'have to know per ACS'" Study them every day in the obvious order. Trust me on this one. I'm the last person you will see carrying around note cards and my family was shocked. But the cards were the most valuable thing I had when preparing. And frankly, I learned ten-times more while making the cards using the book than I did when I read the book. Don't skip the cards! e) Finally, buy and binge watch the Real-World-IFR course from PilotWorkshops. They are a TON of help in the oral because they really teach you how to think, not just regurgitate the regulations. If you want to impress the examiner, this is the icing on the cake. Crazy good stuff and a fantastic educational format.  Real World IFR series by Pilot Workshops. This is an impressive series. Trust me, you will learn a LOT! And the cost is less than one hour of flight time. Step 7: Schedule the checkrideLet's face it, nothing gets finished without a deadline. So when you think you're about ready to test, find a DPE and get it scheduled a month or so in advance. That will force you to get serious and consider it crunch time. Step 8: Go do itGood luck. And don't get all freaked out if you make a mistake during the flight. Noone is perfect. Just relax, fly through any mistakes, and keep on keepin' on! I hope all of this is helpful. If so, shoot me an email at [email protected] ! I would love to hear from you. And don't forget to buy a DynaVibe before you leave the site! Ok, that was shameless...
Pilots and mechanics alike understand that when a propeller is out of balance, the best thing to do is dynamically balance it. A significantly out-of-balance prop can produce pronounced vibrations that are obvious to pilots, thus becoming a catalyst for getting the prop balanced. The benefits of having a balanced prop are well documented: smoother and safer flying, and lower maintenance costs. Aircraft vibration is often insidious, slowly and imperceptibly increasing over time. It may not become obvious to pilots until it is severe, because engine mounts dampen what they feel, reducing the amount of vibration felt in the cockpit. However, persistent, low-level vibration can impact the instruments, engine and airframe. Because these low-level vibrations are harder for pilots to feel, they tend to go unresolved as they produce cumulative damage to critical components. Wayne’s Aircraft Maintenance Services uses a Dynavibe GX3 dynamic balancer and vibration analyzer to help its clients detect and resolve vibration to prevent damage to instruments and other components. The vibration is most often the result of out-of-balance props. Their shop is located in hangar M7 at the Miami Executive Airport, and among their clients are three flight schools located at the airport. Cory Cappe, Director of Maintenance, uses the DynaVibe GX3 while maintaining aircraft for these schools and for his private customers. "Previous to balancing these propellers with DynaVibe, the flight schools were having an issues with instruments and mounts going bad, because of vibration, so we are [now] balancing their aircraft every six months." Since regular balancing of the flight school aircraft began, there have been fewer instrument failures reported. 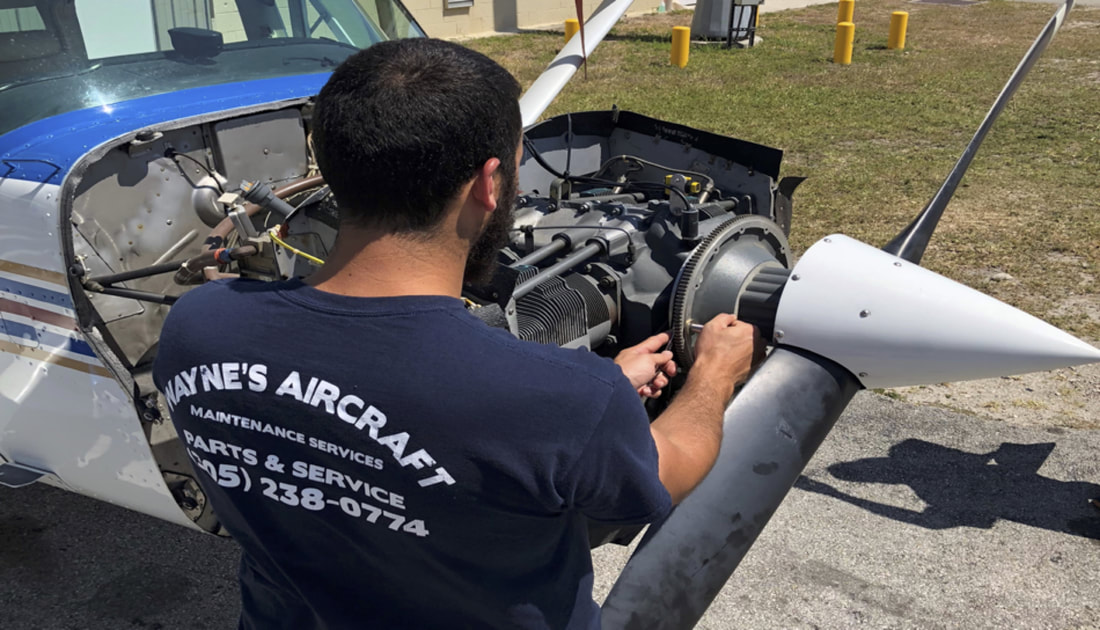 Cory Cappe, Director of Maintenance at Wayne's Aircraft Maintenance Services. Cory found that gyro instruments are particularly prone to damage from vibration, requiring costly repairs or replacement. Investing in regular dynamic prop balancing provides a far less costly measure of protection against instrument failure. Vibration can damage engines and airframes as well. Problems such as fatigue cracks or cracked exhaust systems are indicators that vibration may be compromising an airplane’s structural or mechanical integrity. 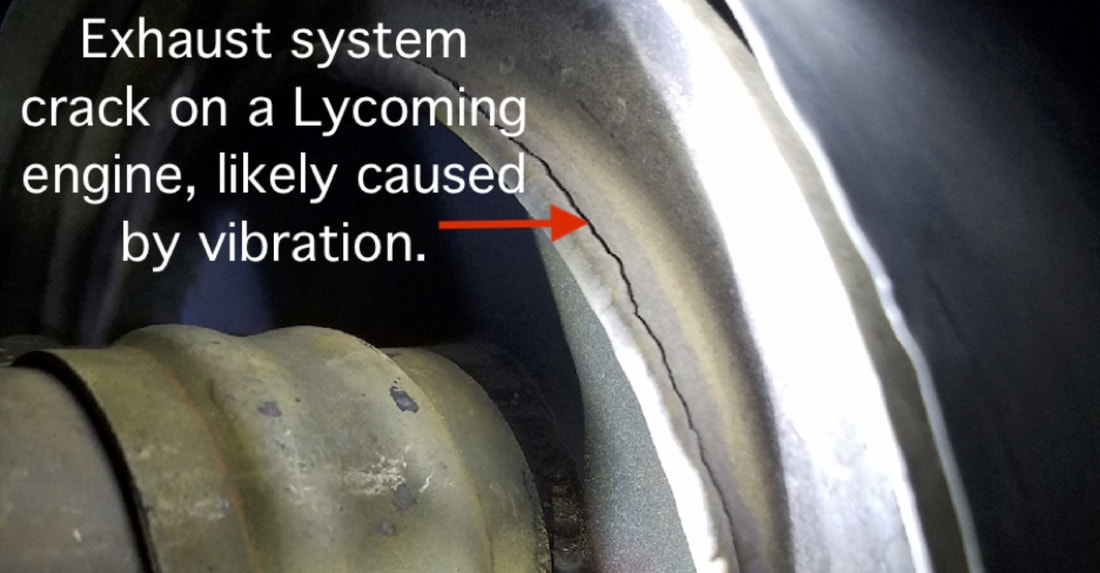 An example of the damage vibration can do to an exhaust system. Cory’s private customers can also feel the difference when they have their aircraft dynamically balanced. A Bonanza came into the shop whose owner reported a bad vibration that he noticed during takeoff. The vibration was so pronounced that the pilot had concerns about flying the airplane. Using the DynaVibe GX3, the initial balancing run on this airplane revealed a vibration between .50 and .60 Inches Per Second (IPS). Vibration of this magnitude definitely indicates a need for balancing, and if left unresolved, can rapidly cause serious damage to the airframe, engine and instruments. Dynamically balancing this Bonanza with DynaVibe reduced the vibration down to just .03 IPS, and the pilot reported that he no longer felt the vibration.
The use of DynaVibe at Wayne’s Aircraft Maintenance Services is resulting in satisfied customers that experience smoother flying and fewer instrument failures. In the first year of usage, the company’s investment in DynaVibe is paying off.
Air2 innovated the provision of helicopter-assisted utility construction and maintenance services for extra-high voltage (EHV) transmission lines throughout North America. The company maintains and flies a fleet of MD 500 helicopters with pilots, crew, and mechanics that are highly trained and specialized for the work they do.
The high voltage power lines the crews at Air2 work on are too in demand to take out of commission for repairs. The Air2 team flies their helicopters into very close proximity to these lines, taking advantage of a thorough understanding of the properties of electrical transmission. The same properties that allow birds to land on power lines without getting electrocuted allow Air2 crews to do their important work, actually transferring linemen from the ship to the line while in hover just feet away from the line. It’s a process you must see to fully appreciate:
Given the critical nature of the work that Air2 does, keeping its ships maintained and in proper track and balance is essential. Tim Galeotti is an Air2 mechanic who helps maintain the eight-ship fleet. Performing regular track-and-balance procedures is part of the maintenance routine. “Well, track and balance, of course, affects the whole aircraft,” says Galeotti. “The closer you can get that reading or vibration down to none in the aircraft, of course, extends the life of your aircraft parts.”
Before acquiring a DynaVibe GX3 with the DynaTrack optical blade tracking accessory, Galeotti had access to two track-and-balance systems from different vendors. Both of these systems had their limitations and both were complicated to use. One broke frequently, and the software on the other one was unreliable. Given the importance of the track-and-balance procedure and the frequency with which Air2 does it for their fleet, having reliable track-and-balance gear is important. Another important factor is gear that is easy to use and allows mechanics to complete the process quickly, “because time is money,” states Galeotti. 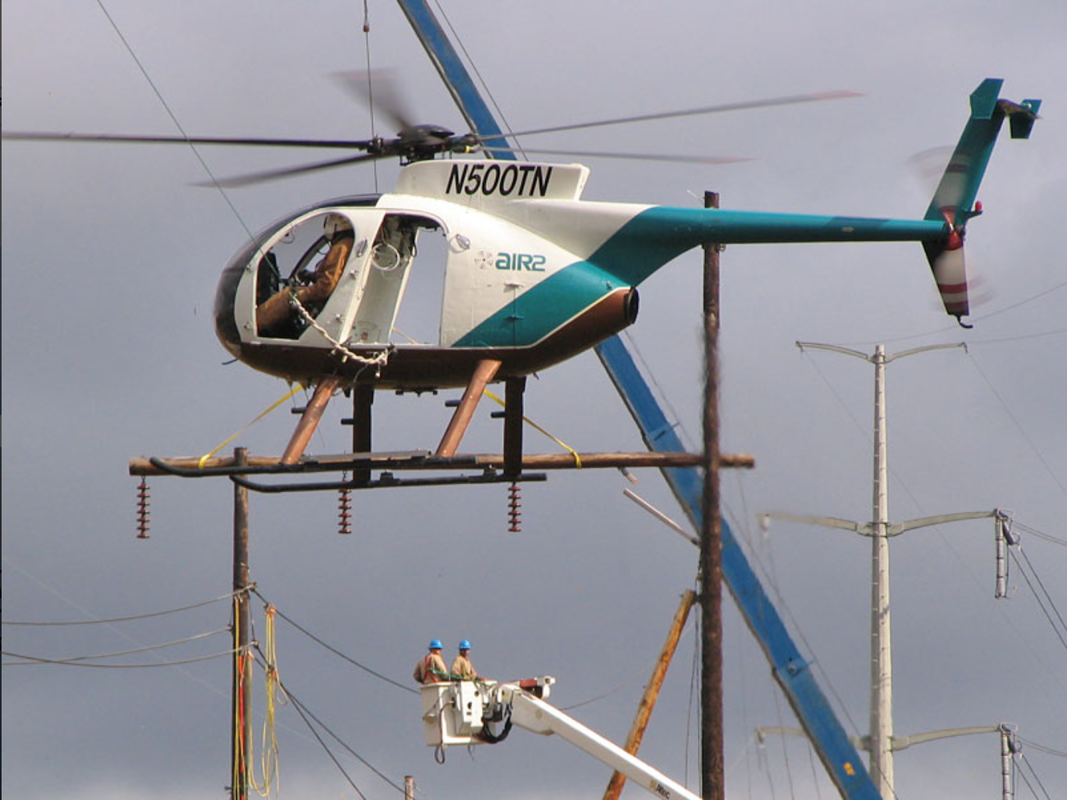
An Air2 MD 500 in hover at a work site.
Having used other track-and-balance gear, Galeotti was impressed with how easy it was to perform the main rotor track and balance on the MD 500 using DynaVibe with DynaTrack. “I was quite impressed because I've used several other devices,” said Galeotti. “What I found really nice was how user friendly it was. I mean, you didn't have these multiple buttons you had to push to get your result, and all we need is a clock angle, its reading; then, we can just plot it out on a chart. Also, with the tracker, it was nice to show exactly how to move that blade up and down in terms of how many inches or half-an-inch, or whatever you need to do.”
One reason the DynaVibe system with DynaTrack is easy to use is because you don’t need another person to hold, aim, and operate a light gun to do blade tracking. A single person can do everything needed to capture accurate readings. The DynaTrack optical blade tracking accessory attaches to the inside of the ship’s windscreen via a suction cup. The pilot or mechanic simply presses the “push-to-talk” button to measure one or two channels of vibration plus blade track, logging results from up to eight flight conditions per flight. “Holding like a gun... it's hard to hold there and get that image,” says Galeotti about the gun tracking systems he’s used, “but this [DynaTrack] here just takes it. I like that.” The DynaVibe GX3 and DynaTrack is portable, allowing Galeotti to take the system anywhere the ships go, enabling the track-and-balance procedure to complete even in the field. “It's one of the simplest devices I ever used, and the smallest and lightest. In comparison to others I've used, it's top-rated I'd have to say. For the money that you spend on that, in comparison to others, you all have a product which is cheaper and works better.” RPX is experiencing record sales for its helicopter track-and-balance kit. The helicopter community is responding enthusiastically to the solution’s ease-of-use and affordable price. As we work with customers to help them obtain and use DynaVibe with DynaTrack to perform track-and-balance procedures, we get lots of questions about how our system works. This post will share a collection of questions we routinely get, with our answers. If you have questions or want more information about how to track-and-balance your ship, please contact us! Q: What is the difference between DynaVibe and DynaTrack? Do I need one or both? A: The DynaVibe GX3 is the handheld system that enables dynamic balancing, vibration analysis, and track-and-balance. An optical tach (a.k.a, phototachometer or phototach) attaches to the GX3 to measure RPM, as do one or two accelerometers to measure vibration magnitude. DynaTrack is an optional optical blade tracking GX3 accessory that enables blade tracking. A complete track-and-balance kit consists of a DynaVibe GX3 (which includes the optical tach and accelerometer) with DynaTrack. Q: Is the DynaVibe and DynaTrack kit suitable for track-and-balance of 3 or 4 blade helicopters? A: Yes. The kit will let you work with helicopters that have up to 6 blades. Q: How big is the system? A: The DynaVibe GX is a handheld system, as the photo shows, it is small and highly portable, easily used in the field. 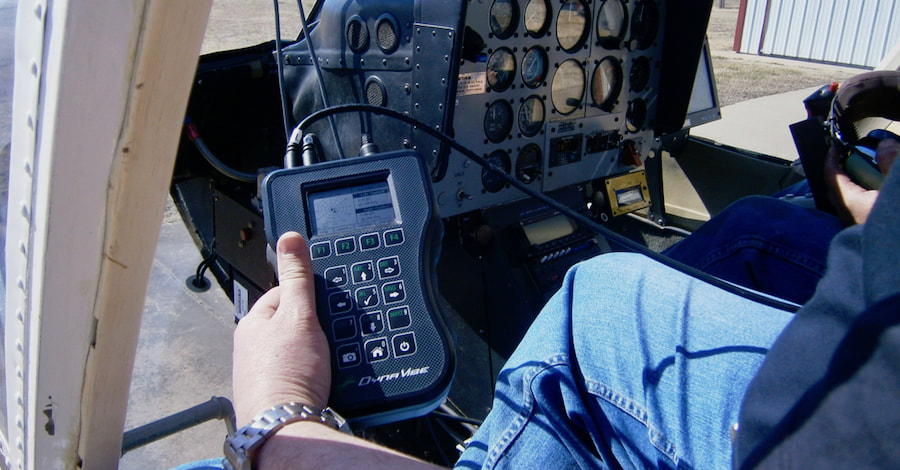 The handheld, DynaVibe GX3. Q: Are the accelerometers used by the DynaVibe system permanently fixed to the cables? A: Yes, the DynaVibe accelerometers and cables are a single, fixed unit. We are aware that competing track-and-balance systems use accelerometers with detachable cables. We know that this question expresses a concern about having to replace the entire unit should a cable get cut or damaged. The good news for our customers is that a complete DynaVibe accelerometer and cable costs less than a cable for our competitor's track-and-balance system! RPX has the most affordable solution for doing track-and-balance. Q: Does DynaTrack measure the main rotor rpm? A: The main rotor RPM is measured by the optical tachometer attached to the DynaVibe GX3. The DynaTrack (also attached to the DynaVibe GX3) measures the blade track error. Q: Does the DynaVibe GX3 system have an input for a magnetic pickup? A: No. DynaVibe uses the industry's state-of-the-art optical tachometer. This approach is better because it is sometimes difficult to make proper adjustments with a magnetic pickup. Q: How we can install the optical tachometer in, for example an AS350 helicopter? Should it be placed vertically to the blade or at some angle? A: This photo shows the setup of the DynaVibe optical tach and accelerometer on an AS350. For most applications, the optical tach is mounted near the transmission and detects a strip of reflective tape on one of the blades grips. 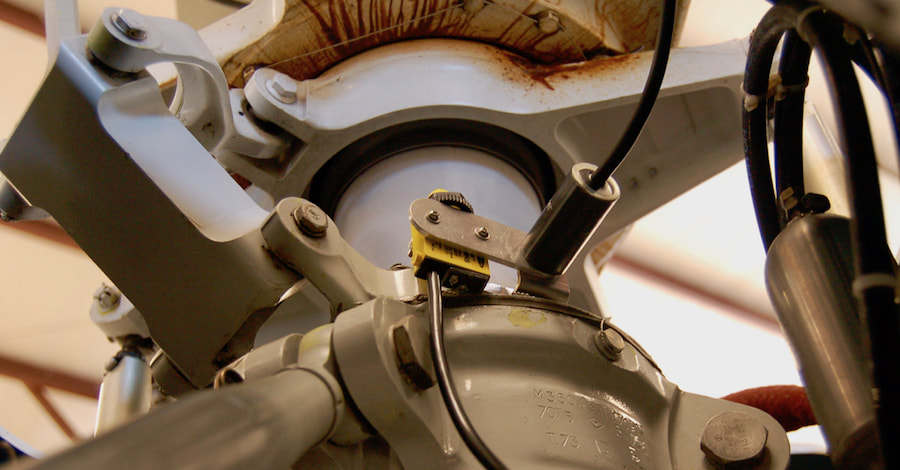 AS350 setup showing mounted optical tach and accelerometer. Q: You state that your system can collect up to 8 flight condition reports. How are those condition reports saved? Do I have to clear the SD card where they are stored after every set of measurements? A: You can get readings (IPS, phase, and track) for up to 8 different conditions per flight. These conditions are per the manufacturer's procedures, or whatever conditions you choose. Once you have completed a flight, you can review all of the conditions for which you captured readings, whether just 1 or all 8. When you begin a second flight, the new flight data will copy over the first flight data. You can go to the track log to review the data you’ve captured. You do not have to manually clear that data for a new flight and new data collection. Q: Can you tell me about the Push-to-Talk button? What is its purpose? A: The PTT button is what lets you do pilot-only data collection, if needed. It enables unit operation with a remote (in-cockpit) PTT switch so you do not have to hold the unit or push its buttons to capture readings. This allows for single-person operation, letting a pilot collect that data while concentrating on flying the aircraft. Using DynaTrack does not require two people. 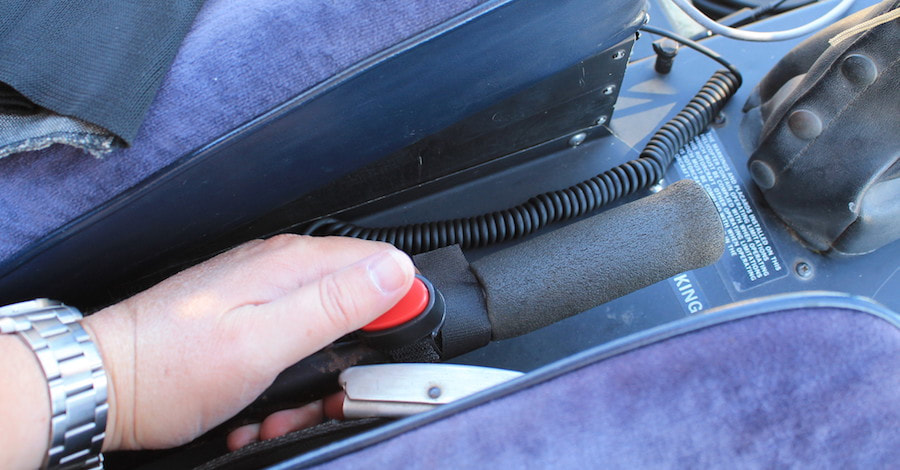 DynaTrack Push-to-Talk (PTT) button. Q: For what helicopters do you have Application Notes?
A: RPX has already published application notes for Bell 205, 206, 407, OH-58, EC350; Hughes 300, R22, R44, and Rotorway. We are regularly completing new Application Notes. Keep in mind that an Application Note is not required to use DynaVibe for track-and-balance on a helicopter, but it is helpful for installation and operation purposes. RPX Application Notes follow the manufacturers recommendations for track-and-balance, so if you have the maintenance manual and corresponding balance charts, you have what you need to track-and-balance using the system. Q: Can you tell me about calibration? How long does it take? A: A new DynaVibe GX3 unit comes already calibrated. As with many aviation tools, annual NIST-traceable certification is required for tools used on certified aircraft. For the DynaVibe GX3, recalibration costs just $249 USD. To have it recalibrated, just contact us for an RMA number and then send the unit and accelerometer(s) to RPX; there is no need to send the entire kit. We can complete a recalibration in one day, not including the shipping time. Q: What kind of guarantee or warranty covers DynaVibe and DynaTrack? A: We provide a money-back guarantee for the first 30-days after purchase. If you’re not satisfied with the system, you can return it for a full refund. A limited, lifetime warranty covers the purchase of new DynaVibe GX3 systems and DynaTrack accessories. Other accessory items are covered for a one-year period. Q: In which format is the output file that contains the measurement data? A: DynaVibe provides its output in the form of an HTML document, so no proprietary software is required to view the data, and it is easily shared. Q: Are DynaVibe software updates available for free? A: Yes. Software updates are free and obtained on the support page of the RPX website. Q: Is it possible to review a User’s Manual for this device? A: Yes. To obtain one, simply contact us through the website, by email or telephone and we will send you a free, current copy. If you have other track-and-balance questions, please contact us! RPX Technologies is pleased to announce that the DynaVibe GX3 with the Turbine Sensor has been accepted by Williams International as vibration analyzer equipment which meets the test requirements for the Williams FJ44 and FJ33 engines. For less than $6,950, Williams Jet Service Centers can equip themselves to perform turbine vibration surveys more profitably. The DynaVibe turbine system provides Williams Jet Service Centers with affordable equipment for accurate, high-frequency vibration measurement. The system maintains accuracy up to 1.2 million Cycles Per Minute (CPM) and utilizes a high-quality, high-frequency flat-response sensor to deliver measurement data reliably. This system is accepted for Williams-mode acquisition and reporting, providing an ideal vibration survey solution for Williams Jet Service Centers. 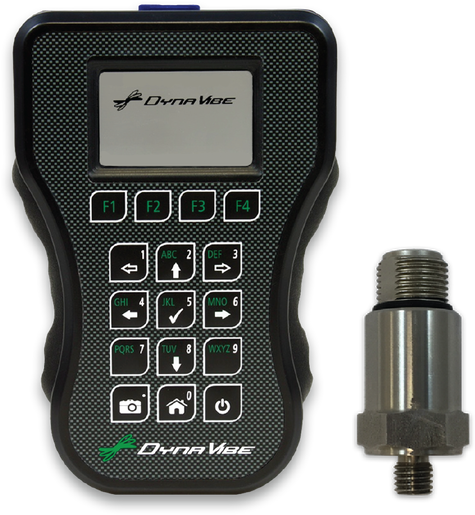 The DynaVibe GX3 with turbine sensor. Pricing & Availability
The DynaVibe Turbine Vibration Analysis Kit includes a DynaVibe GX3 meter, one turbine sensor, cables, and a manual in a protective case. The kit is available to purchase now for $6,950. Existing DynaVibe GX3 owners can add the turbine sensor to their current GX3 system for $2,955. To learn more about or purchase the DynaVibe Turbine Vibration Analysis Kit, or to add a turbine sensor for existing GX3 units, contact RPX Technologies at +1.405.714.2516 or [email protected]. It’s been a decade since RPX Technologies began offering DynaVibe propeller balancing equipment to the aviation industry. In that time, we have collected a lot of data about the state of prop imbalance. Our data tells us that about 80% of props are out-of-balance, and when they are dynamically balanced, owners, pilots and mechanics report that the difference is amazing. What does it mean when we say that 8 out of 10 general aviation aircraft are flying with an unbalanced prop? Technically speaking, it means that the measurable vibration exceeds .15 Inches Per Second (IPS), which is the maximum acceptable vibration level after dynamic balancing. We’ve seen vibration levels that are much greater, and the greater the magnitude, the more damage the vibration can do to the airframe, engine and instruments. Eliminating vibration is important just for the maintenance benefits alone. But if that is true, why are so many airplanes flying with unbalanced props? The reasons vary, but often it is because of a false assumption that vibration is just the price you pay for having a combustion engine that turns a propeller at a high RPM, and therefore it must be lived with. Don’t buy in to this false assumption! We’ve seen many DynaVibe users eliminate vibration completely, or get it well below .10 IPS – a level of acceptable vibration. What would YOUR plane feel like after using DynaVibe? The reactions and feedback we get from DynaVibe users that experience flight with a balanced prop answer this question. These comments have a similar theme, and we never tire of hearing them. Here are some we’ve collected through the years:

These are just a sampling of the testimonials we’ve collected from customers about the results they get from using DynaVibe to balance their props. They can feel the difference after balancing. We’ve made it easy and affordable for you to feel the difference too, with the DynaVibe Classic prop balancer costing just $1,495. Contact us to learn more about how you can enjoy smoother, safer flying while lowering your maintenance costs. As the creators and inventors of DynaVibe – the RPX Technologies dynamic balancing system – we’re naturally proud of the innovation it represents, as well as its affordability. DynaVibe with its accessory DynaTrack optical tracker, or the optional turbine kit, is a leading-edge, state-of-the-art system for prop balancing, blade tracking and turbine vibration surveys. So what?
In the 10 years since RPX was founded, we’ve learned some important truths about how customers perceive and evaluate solutions. We can make some wonderful claims about how affordable DynaVibe is, how easy it is to use, how it makes quick work of prop balancing, or even how differently an airplane or helicopter flies once props are balanced or blades are in track. But, despite the claims we can make about DynaVibe, we’ve learned there’s just one customer question we must answer: “Why should I care?” In the decade we’ve served the aviation industry, we’ve collected a lot of prop balancing data. We know this: there’s an 80% chance that the general aviation aircraft you are flying has an unbalanced prop. What does that mean? From a technical sense, it means that the measurable vibration exceeds .15 Inches Per Second (IPS), the maximum acceptable vibration level after dynamic balancing. At .15 IPS vibration may not seem like much, but it is not a lack of vibration. Four out of five GA aircraft are flying with vibration levels of .15 IPS or greater. What’s the problem with this? Vibration only has negative consequences. Your unbalanced prop is either:
Or some combination of these three things. Dynamically balancing your prop is a quick and easy fix. We have a page on our website – and numerous blog posts – that all share the testimony of those who have rid their aircraft of vibration by using DynaVibe. If we were to summarize, in the sentence, what we often hear after balancing, it would be “I can’t believe the difference!” or “It feels like a brand-new airplane!” You will feel a difference when you dynamically balance your prop. If it could, your plane would thank you. RPX also sells the most affordable track-and-balance system for helicopters, that also is very easy to use, and streamlines the track-and-balance process. But again, “Why should I care?” is a fair question. The track-and-balance process is a bit more complex than the prop balancing process, and historically, the equipment has been more complex to use as well. Since we entered this market with our DynaTrack solution, we found that many shops who had older track-and-balance gear were frustrated with it. It was hard to use, took too long to complete the process, or both. The result in many cases was that tracking on blades on some ships wasn’t done, or done very often, because the process was too difficult. We’ve found that there are two types of users who really value DynaTrack. One is the user who previously could not afford the $20,000+ price tag of a track-and-balance system. At under $7,000, our system is within reach of almost everyone! The other type of user that has grown to love DynaTrack is the one who was frustrated with their old system. Ours is really easy to set-up and use, and because it is so affordable, you can replace your old, frustrating equipment with the DynaTrack which is easy to operate. With our patented Blue-Track technology, it is easy to accurately track blades under a wider variety of sky conditions, saving you a lot of time and frustration. Because DynaTrack is so affordable, you can have a couple at the shop so your mechanics can work on multiple ships simultaneously and an additional tracker in the field which would increase productivity and make you more money. In summary, customers care about DynaTrack because it is less frustrating to use than your existing equipment and it will make you more productive. DynaTrack is also contributing to cleaner air around the shops that use it. Not because of carbon emissions, but because its use is not accompanied by cursing. Track, balance, done! No profanity needed. |


 RSS Feed
